Installing SpokenCode on Windows
This guide walks you through installing SpokenCode on a Windows PC using the official pre-built installer. Before you begin, make sure you have a SpokenCode API key — you'll need it to activate the app after installation.
Prerequisites
Before starting, make sure you have:
- Windows 10 or Windows 11 (64-bit)
- A working microphone (built-in laptop mic or any USB/3.5mm microphone)
- A SpokenCode API key — get a free one at spokencode.dev
- An internet connection for the initial download
Step-by-Step Installation
1. Download the Installer
- Go to spokencode.dev and navigate to the downloads section
- Click the Download for Windows button to download
SpokenCode-1.0.54 Setup.exe
Only download SpokenCode from the official website at spokencode.dev. Do not install copies from third-party sources.
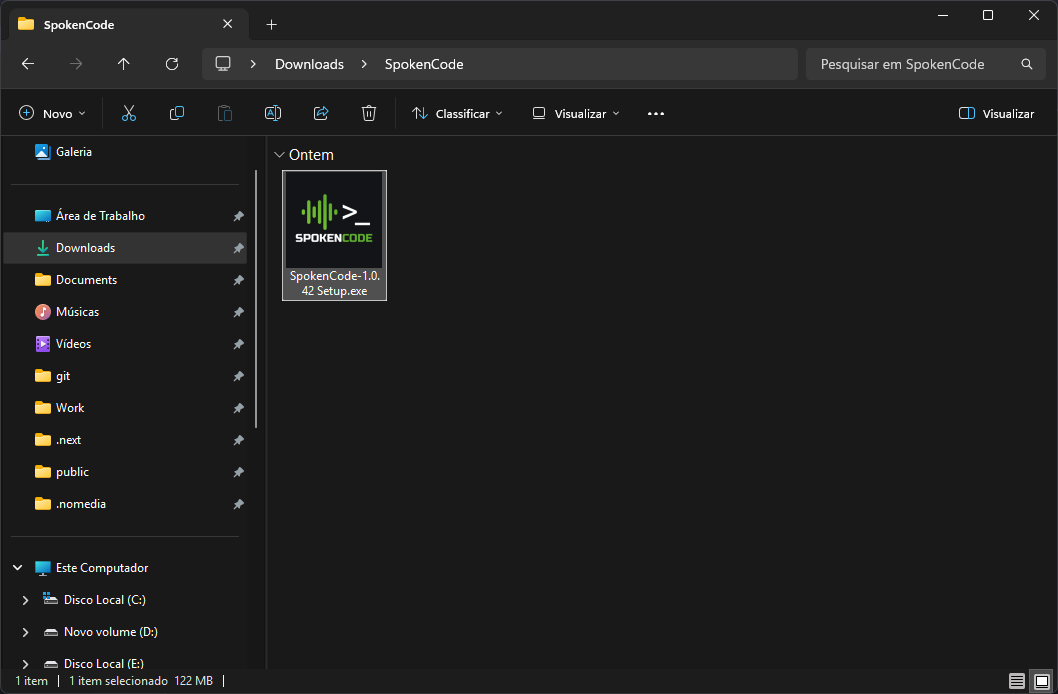
2. Run the Installer
- Open your Downloads folder
- Double-click
SpokenCode-1.0.54 Setup.exeto start the installer
3. Handle the Windows SmartScreen Warning
You may see a blue warning dialog from Windows SmartScreen saying "Windows protected your PC". This is expected for newly released software.
- Click "More info" (the small link below the warning text)
- Click "Run anyway"
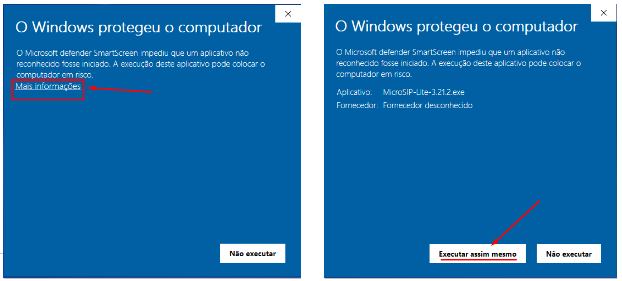
Why does this appear? Windows SmartScreen flags installers that haven't yet built up a download reputation with Microsoft. This is common for newer desktop applications. The SpokenCode installer is safe — you can verify it was downloaded directly from spokencode.dev.
4. Accept the UAC Prompt
If a User Account Control dialog appears asking "Do you want to allow this app to make changes to your device?", click Yes.
5. Complete the Setup Wizard
The SpokenCode Setup wizard will open:
- Click Next to proceed past the welcome screen
- Choose an install location (the default is recommended) and click Next
- Click Install to begin copying files
- When the progress bar finishes, click Finish
Leave the "Launch SpokenCode" checkbox checked to open the app immediately after the wizard closes.
6. Launch SpokenCode
SpokenCode is now installed. Open it from any of these places:
- The desktop shortcut created by the installer
- The Start Menu — press the Windows key and search for "SpokenCode"
- The system tray — if the app launched automatically after install, look for the SpokenCode icon in the bottom-right corner of your taskbar
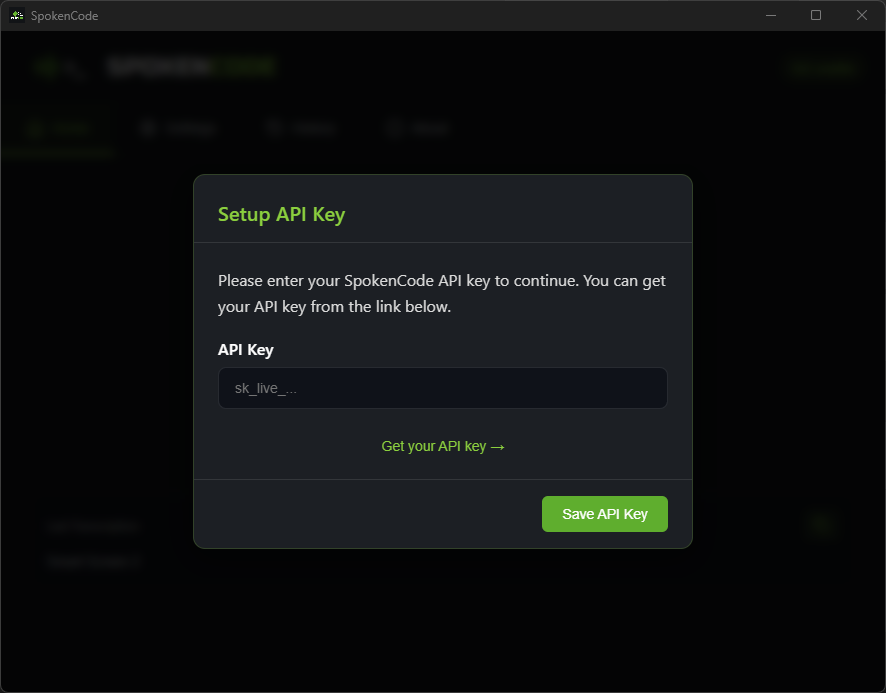
7. Enter Your API Key
The first time SpokenCode opens, a setup modal appears automatically asking for your SpokenCode API key.
- Paste your API key into the API Key field
- Click Save API Key
- SpokenCode validates the key and displays your current credit balance
Your API key is shown only once when you register at spokencode.dev. If you didn't copy it at the time, log in to your account dashboard and generate a new key.
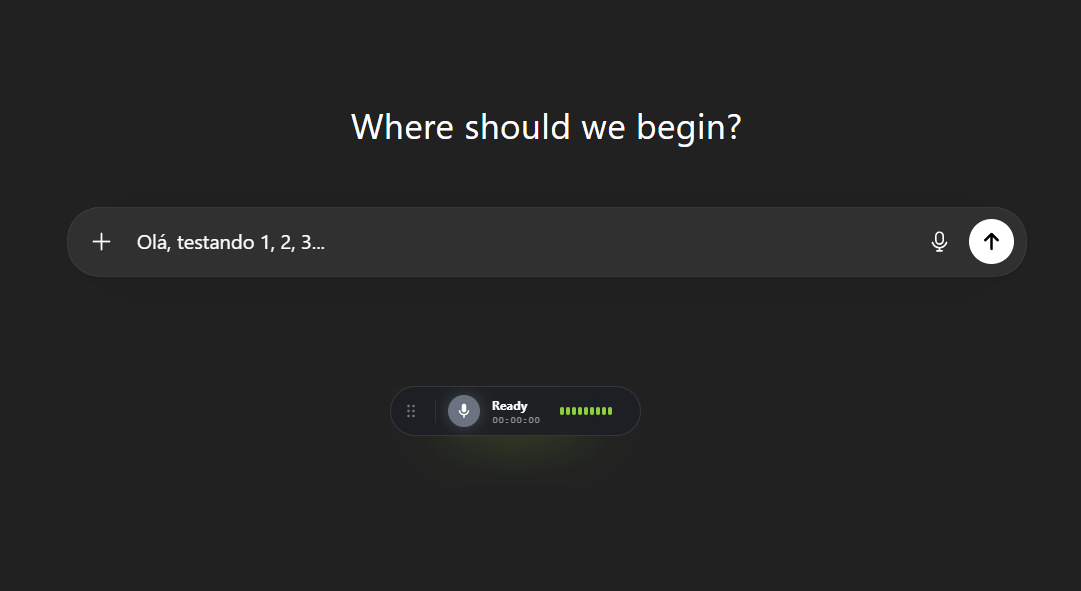
8. Test Your Microphone
Verify that SpokenCode can hear you before using it for real work:
- Click anywhere in a text field — a code editor, Notepad, or even the browser address bar
- Press and hold Ctrl + Win
- Say a few words, for example: "hello testing one two three"
- Release Ctrl + Win
SpokenCode will process the recording and type the transcribed text at your cursor position. If text appears, your setup is complete.
Optional: Wake Word ("Okay Code")
If you want to use the "Okay Code" wake word to start recording hands-free (without pressing a hotkey), you need to install Python 3.10 or newer and a few packages before or after installing SpokenCode.
Step 1 — Install Python 3.10+
- Go to python.org/downloads and download the latest Python 3 installer (e.g. Python 3.12.x)
- Run the installer
- On the first screen, check "Add Python to PATH" before clicking anything else — this is critical
If you skip "Add Python to PATH", SpokenCode will not be able to find Python and the wake word will not work. If you already installed Python without this option, uninstall it and reinstall with the checkbox checked.
Python 3.7, 3.8, or 3.9 are not supported. If python --version shows one of these, install Python 3.10+ and make sure it is set as the default.
- Click Install Now and wait for the installation to finish
- Click Close
Step 2 — Install the required packages
- Press Windows + R, type
cmd, and press Enter to open a Command Prompt - Copy and paste the following command, then press Enter:
pip install openwakeword numpy pyaudio
- Wait for all packages to finish installing. You will see download and install progress for each one
- When the prompt returns (no more output), the setup is complete
If pip install pyaudio fails, try this alternative command instead:
pip install openwakeword numpy PyAudioWPatch
PyAudioWPatch is a Windows-compatible version of pyaudio that works on all systems.
Step 3 — Enable the wake word in SpokenCode
Open SpokenCode → Settings → Voice Commands → turn on the toggle. Then say "Okay Code" — recording will start automatically.
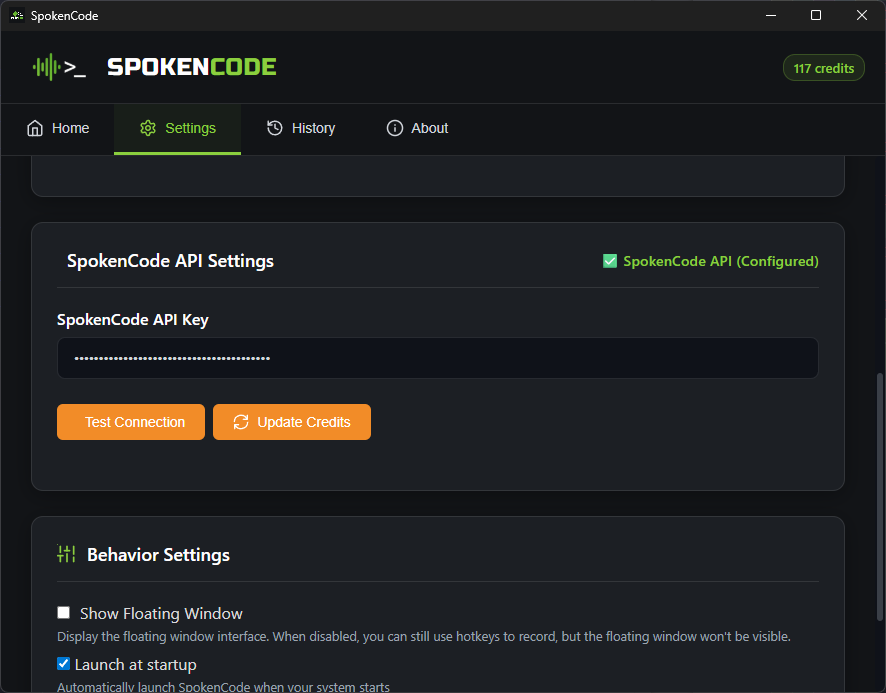
Configuring the SpokenCode API Key
Where to Find API Key Settings
To change or update your API key at any time:
- Open SpokenCode
- Click the Settings tab
- Scroll to the SpokenCode API Settings section
- Update the API Key field and click Save Settings
- Click Test Connection to verify the key is valid
Getting a Free API Key
- Go to spokencode.dev
- Create a free account
- After registering, your API key is shown once — copy it immediately and store it somewhere safe (a password manager is ideal)
Your key will look like this:
sk_live_aBcDeFgHiJkLmNoPqRsTuVwXyZ123456
It always starts with sk_live_ followed by 32 characters.
What Happens If the Key Is Invalid
If the API key is missing or incorrect, SpokenCode will:
- Show the setup modal on every launch until a valid key is saved
- Display the message "Invalid API key" when you use Test Connection
- Not transcribe any recordings — the hotkey will appear to do nothing
Quick Start: Using SpokenCode
Once set up, SpokenCode runs silently in the background. You don't need to keep the window open.
The Global Hotkey
| Action | Hotkey |
|---|---|
| Start recording | Hold Ctrl + Win |
| Stop recording and process | Release Ctrl + Win |
The hotkey works from any application — your code editor, terminal, browser, or any other window. Place your cursor where you want output to appear, then press the hotkey.
Two Modes
SpokenCode has two modes, which you select in Settings:
| Mode | How it works |
|---|---|
| Transcription Mode | Speech is converted to plain text and typed at your cursor |
| Snippet Mode | Start your sentence with a keyword to generate code, commands, or AI responses |
Voice Command Keywords (Snippet Mode)
In Snippet Mode, begin your sentence with one of these keywords:
| Keyword | What SpokenCode generates |
|---|---|
command | A shell or terminal command |
javascript or code | JavaScript code |
typescript | TypeScript code with type annotations |
python | Python code |
hotkeys | Physically presses a keyboard shortcut |
translate | Translates text to another language |
help | A general AI-generated answer |
Example: Say "python loop through a list and print each item" → SpokenCode types a Python for loop directly into your editor.
Speaking without a keyword in Transcription Mode types your words as plain text.
The Floating Window
When you press the hotkey, a small floating window appears on screen showing the recording status and the transcription result. To disable it, go to Settings → Behavior Settings and uncheck Show Floating Window.
Troubleshooting
Windows SmartScreen blocks the installer
This is covered in Step 3 above. Click "More info" then "Run anyway". This prompt only appears once at install time.
Microphone not detected
- Right-click the speaker icon in the system tray and select Sound settings
- Under Input, confirm your microphone is listed and selected as the default device
- Verify SpokenCode has microphone permission: open Windows Settings → Privacy & security → Microphone and make sure the toggle for SpokenCode is turned on
Wake word not working
- Check Python is installed — press Windows + R, type
cmd, press Enter, then typepython --versionand press Enter. The output must show3.10or higher (e.g.Python 3.12.3). If it shows3.7,3.8, or3.9, or if you get an error, install Python 3.10+ from python.org making sure to check "Add Python to PATH". - Install the required packages — in the same Command Prompt, run:
If
pip install openwakeword numpy pyaudiopyaudiofails, usepip install openwakeword numpy PyAudioWPatchinstead. - Check that the toggle is enabled — open SpokenCode, go to Settings → Voice Commands and confirm the toggle is switched on.
- Microphone access — ensure SpokenCode has microphone permission in Windows Settings → Privacy & security → Microphone.
Hotkey not working
- Confirm SpokenCode is running — look for its icon in the system tray. If it's not there, open SpokenCode from the Start Menu
- Another application may be intercepting Ctrl + Win. Try closing other running apps and testing again
- Re-register the hotkey: open SpokenCode, go to Settings → Keyboard, change the Recording Mode setting, click Save Settings, then change it back and save again
App doesn't start
- Try launching from the Start Menu rather than the desktop shortcut
- Open Windows Event Viewer (search for it in the Start Menu), then navigate to Windows Logs → Application and look for errors from SpokenCode
- Reinstall: uninstall SpokenCode first (see Uninstallation below), then re-download and run the installer
Uninstallation
Option 1 — Windows Settings:
- Open Settings → Apps → Installed apps (Windows 11) or Settings → Apps & Features (Windows 10)
- Search for "SpokenCode"
- Click SpokenCode → Uninstall and follow the prompts
Option 2 — Control Panel:
- Open Control Panel → Programs → Programs and Features
- Select SpokenCode from the list
- Click Uninstall
Building from Source
This section is for developers who want to build SpokenCode from source. If you just want to use the app, use the installer above.
Prerequisites
- Git
- Node.js 20 LTS — recommended: install via nvm-windows
- npm (bundled with Node.js)
- Python 3
- Visual Studio Build Tools — download from visualstudio.microsoft.com and select the "Desktop development with C++" workload during installation
Clone and Build
git clone https://github.com/Gustavo-Kuze/spokencode-desktop.git
cd spokencode-desktop
npm install
npm run make
The packaged Windows installer will be output to ./out/make/.
Run in Development Mode
To launch the app without building an installer:
npm start